Thanks to the scholarship program of the Northern Lights Library Network I was able to attend the Minnesota eLearning Summit held in Minneapolis on July 29 and 30. This conference is a unique opportunity to receive professional development that crosses the lines from K-12 into post-secondary. The focus of the conference is in online and blended learning, and with the impending requirement for Minnesota students to take an online class prior to graduation it is especially pertinent for today.
The conference began Wednesday morning with a keynote by Aaron Duehring. Duehring is a professor in learning technologies at the University of Minnesota and the director of the Learning Technologies Media Lab. Aaron’s talk, Innovations in Technology-Enhanced Learning: Designing for Transformation and Engagement, focused on the learning adventures he has taken part in.
Aaron’s projects all allow students to become involved in them, not just as an observer but as an explorer. Here are a few websites that will help you in this process:
www.weexplore.com: We Explore Adventure Learning Environment allows learners to become explorers pursuing answers to their questions and sharing their findings with the world.
Savingplaces.org http://goo.gl/FRu2Ow: Take action to help save America’s national treasures!
Raptor Lab! https://theraptorlab.wordpress.com/: Devouring science, one post at a time.
Be the Change Earth Alliance: http://www.bethechangeearthalliance.org/actionchallenge: Weekly posts to help raise awareness with your community.
Session A
- A Digital Story Assignment Using Mobile Devices and WeVideo
- Greg Steinke, College of Continuing Education, University ofMinnesota
The first session I took part in was in the use of the Google+ community for class assignments, and particularly with the use of wevideo for student-created videos. The work for this session was based on Joe Lambert, Center for Digital Storytelling. Greg stressed that organization is key, and that there are many ways to complete this project, but that wevideo worked well for him. He appreciated the options to record the screen in wevideo, as well as an easier way to share than iMovie.
Session B
- Motivating and Supporting Students: Designing for Meaningful Learning in a High Enrollment Online Course on Student Wellness
- Amy LimBybliw, University of Minnesota
The second session I attended was a program discussion of an Online Wellness Program developed for the University of Minnesota. Although the session wasn’t particularly geared for K-12 there were many lessons that can be learned from their work.
I am planning to begin the school year with an online course that all students in the high school will be required to take. This type of course hasn’t been offered previously and I am looking for tips on creating a successful online course. The suggestions given by Amy helped me to consider the types of assignments that will make sense for student feedback. She also lead me to reflect on how I can “grade” or respond to student assignments. It probably is not feasible to think that I could possibly respond to every student.
Amy’s courses are monitored by student TAs. I hadn’t considered using students to assist, but it might be practical to do so. Amy also stressed the importance of starting with a welcome video from the teacher, offering clear directions and assignment options, providing a way for students to give feedback (that is easy), and creating a tech support hub to help when students get stuck.
Session C
Following lunch and poster sessions I presented a session on Enhancing Critical Thinking Skills with Technology. It was attended by about 30 people and seemed pretty well received. I tried to present suggestions for using technology embedded in to instruction at all grade levels, but I know that most of my suggestions and activities were geared toward the lower grades.
Session D
- Keeping Yourself Organized When Designing Courses
- Mary Bohman, Winona State University
The last session I attended on the 4th day was a session on project management. It provided some excellent suggestions for the use of a project management app called Trello. With both a browser and an app option, Trello sets up specific boards, which can each hold lists and tasks. This app would allow me to set up a board for each teacher I meet with (or grade level or other group), and record our meeting notes, tasks, lists, and other information. I think this would be a wonderful way to track these interactions, and I’ve been looking for a tool that would help with this.
Trello has a free account and can be accessed from any device or computer and is located at https://trello.com/guide/board_basics.html. Following the discussion Trello, another instructor shared Evernote and explained how it was being used in a similar way. I have used Evernote previously but had quit using it when I became a more active Google user. Although I appreciated seeing it in use I don’t think I’ll spend any more time with it, but I do believe it is a great tool and can be very useful for many educators.
On Thursday, June 30 I attended the second day of the conference. The first session of the day that I had selected attending was cancelled and I ended up spending more time with the vendors and poster sessions. I had many questions for several vendors, and in particular I was anxious to speak to the representative from Blackboard.
Session F
- DocentEDU: Turn Any Website Into an Engaging and Interactive Lesson
- Matthew Nupen, DocentEDU, NE Metro 916
Then I attended a session put on by Matt Nupin and Karin on DocentEDU. Matt and Karin are teachers who created the Docent tool to help them present content for their courses in a more cohesive way. They ended up copyrighting, and now marketing, the tool. I was incredibly impressed with DocentEDU! My high school science teacher had seen this tool right at the end of the school year and I’m excited to share with him further and discuss the ways we can integrated DocentEDU into our school.
I also listed these apps/websites as items to look into further.
- EMaze – a presentation tool that looks similar to Prezi.
- Hank Green for science videos that look terrific.
- Edpuzzle: a tool that lets you crop YouTube videos. Use EdPuzzle to show the video and they don’t end out on YouTube
- Clipit: a tool that allows you to record lessons
The link to the handout is here: https://docs.google.com/presentation/d/1f8SJ9wf-jiaWmEVlonGL_qCVREr-FibNTKLqtMwyuBs/mobilepresent?slide=id.p
It looks like you can embed almost everything into DocentEDU – Quizlet, Prezi, any Google tools, and much, much more! I was disappointed to hear that they will be charging $40 annually for DocentEDU. They do have a school pricing as well. I may be able to demo it with my staff without paying for the registration, but if staff want to use it they will have to pay, and I always feel bad about that. However, if a teacher were to use it I think they would find it to be an awesome tool, and one that would cut down on distractions in the classroom.
It was in this session that I also heard about a hilarious video on the Key&Peale-teachingCenter about the “teacher draft”. It is well worth watching and would be a fun video to share with staff for a light moment.
Keynote
The second keynote of the conference was a talk on Open Courseware given by David Wiley from Lumen Learning. Wiley began by giving a definition of education that I love:
Education=sharing
And education is especially about sharing your passion!
He then shared the data on costs related to published textbooks and their comparable “free” open courseware. There is now data comparing assessment results between the two that is very positive. Wiley has some strong opinions about the cost of educational print texts. One of his points was that, although publishing companies are trying to do things to update their materials, they are still very expensive for students. He compared the monthly rate students were being charged for one textbook ($20) with the amount they can pay for unlimited NetFlix (9.99 monthly) AND unlimited Spotify music ($7.99 monthly) and questioned why any student would rent the text! In addition, the norm is that students are either losing access to the text or being told to sell the book back as soon as the course ends. This sends the message that the book isn’t of value (or that the course content is valuable).
Openedgroup.org shows the data used in this presentation. Wiley recommends thinking about “renewable assignments” – and he shared an excellent example in a youtube video a couple of students created several years ago comparing blogs and wikis. The students took a video of a debate between JFK and Richard Nixon. They removed the audio and dubbed over an fictitious argument between the two – in a very creative way! You can enjoy it here:
https://youtu.be/AsFU3sAlPx4
Session G
- Google Hangouts On Air – Broadcast to the World
- Andy Leiser, ISD 200: Hastings Public Schools
I entered this room with a bit of concern. I’ve been hanging out in Google for a long time. Was Andy going to teach me anything new?
From the minute I entered the room, however, I was amazed! Not only did Leiser explain (very clearly) how to set up Google Hangouts on Air, he also shared a huge range of ways that he uses not only Google Hangouts, but many other tools. Google Hangouts on air stream live, but on a short delay. They are shareable through a URL, so anyone can attend. And when completed, they are saved in youtube and can be watched by anyone.
I am excited to consider using Google Hangouts in these ways:
- With the Telegami app
- With Magisto app – telling stories
- Using hangouts when kids OR PARENTS or teachers! Are unable to attend a meeting, a concert/play/event, or a class!
- Afternoon pd through Hangoutss – by leaving a room open and allowing teachers to “dial in” for discussion or questions.
- Have teachers from your school online to answer questions or share info – even if they’re right down the hall.
- A really cool way to flip PD. I could do this one day after school each week, and teachers could attend but wouldn’t have to leave their room. I think they’d love that!
- Teach a lesson to multiple classes at a time. This would allow all teachers to assist but to do the lesson simultaneously (rather than scheduling it many times and going from room to room).
- Live broadcast of plays, etc.
- Hangouts with “famous people” – authors, politicians, student athletes, etc.
Directions for using Google Hangouts on Air:
- Click hangouts from drop down menu. Then click Hangouts on air.
- Name the video.
- Describe if necessary. Keep public (unless you want)
- Then put in time. You don’t have to have this exact.
- Then click start.
- Duration is just for scheduling, and also doesn’t need to be exact.
- Add in it individuals, circles, etc.
- It goes to your events page in Google Plus.
- You can change it, etc.
- Links are located under details on right side.
You can just share the YouTube link. They can go to it and just watch. Leiser had a few tips that he shared, and I thought they were very helpful. These included arriving early in order to set everything up, checking everything to make sure it works, and having anyone needing speaking rights practice turning their microphone on and off.
This coming school year Andy is making it his mission to showcase what’s good in his school using Google Hangouts on Air. His theme for the year is: Share your Story. It will be fun watching him as the year progresses. You can follow Andy on his blog here: http://isd200is.weebly.com/home.html
Session H
- Kickstart Open Lab: An Experiment in Incentivizing Innovation, Enhancing Teaching & Learning, and Diffusing Technology
- Austin Calhoun, School of Kinesiology, University of Minnesota
Kickstart Open Lab is a cool idea that the U has created as a way to work with teachers and technology. Any professor can sign up with a tech “challenge” and meet with an open lab setting. These meetings are not a hit-n-miss, one-time session, but a consistent regular meeting time, where tech support and teacher set goals for the year and then work together to complete them.
One neat tool that I learned about was ChimeIn, which could be used for attendance. This is a cool idea, like an entrance ticket or review question from the day before, although it also could be used as an exit ticket tool. I hadn’t seen it before. ChimeIn works similarly to student response clickers but works on any device or computer with web access. It seemed pretty seamless in our session.
As I attended this session I gleaned some interesting tips and ideas, but mostly found them to be food for thought. The Kickstart concept seems to be an additional tool I could have in my toolbelt as I work with educators, and may appeal to those who don’t readily come to me for assistance. Paired with an organizational tool such as Trello, which I could use to record notes, meeting minutes and plans, this might be an excellent approach. It is so easy to talk to a teacher and say “we should try this some time”, but so often we never get to the actual work. I believe this might make me better at working with teachers in a consistent manner.
Overall Minnesota’s eLearning Summit was a wonderful professional development opportunity! I appreciated the chance to attend, as well as to present, and I look forward to sharing my new-found knowledge with the educators in northern Minnesota. Thank you Northern Lights Library Network!
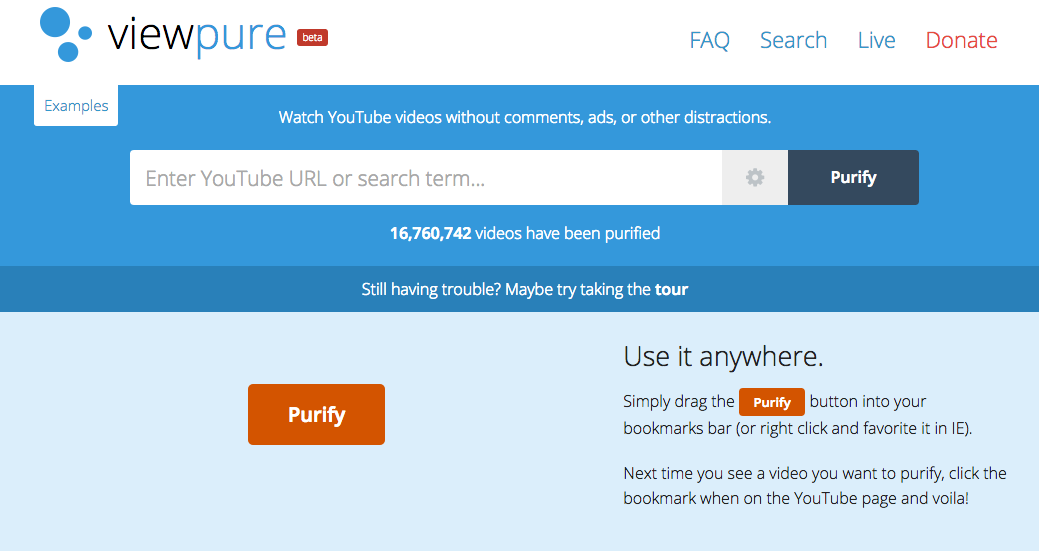 Viewpure allows you to “wipe the edges” of any video – one you created and uploaded, or one you located on youtube – and share it in a big clear page. The process of purifying a video is super easy! Simply add the Purify button
  pe of website or learner management program. Most have expressed the frustration of having all the other “crap” around their videos. Viewpure solves this problem beautifully!